Sunday, July 1, 2012

JULY ARTICLE 2012

“TRX”2012 THE ULTIMATE WORK OUT TO SHAPE AN AMAZING ATHLETIC AND STRONG BODY PART 1


Hello my dear readers!!!....I am so excited to share with you this piece of
Equipment called “TRX” Suspension Training http://www.trxtraining.com/that has taken all “us”trainers and clients to another HIGHER LEVEL of Fitness. I had my training in this last year in the “IDEA WORLD FITNESS CONVENTION” http://www.ideafit.com/ which happens every year in The States, “WE” trainers go to learn New and Advanced techniques to help reach the fitness goals of our cliental, this year will be San Diego july 4th 2012 and i will be bringing you fresh TRENDS and the latest of the Fitness Industry. The TRX has “3 BASIC FACTORS” which is mores simple words for you guys will be LEVER, GRAVITY AND BALANCE. These 3 factors will make your workout as hard and exciting as you want!!. I have to tell you that this workout is KICK ASS ONE, no cheating or not putting your 100% effort and attention on it, when you do ONE of this YOU WILL see that the “Holly Spirits” are talking to you before you pass out.


There are some “RULES” to follow in this Workout that you have to keep in all the exercises. 1.- “ DO NOT LET LOOSE THE TRX STRAPS” when you are staring or finishing the body parts you are performing.
2.-Your “Core, Abs or Power House” has to be contract and sucked in all times during the exercise that what will give you a correct “posture” which is back long, tall and straight.
3.-Your BREATHING is very important, when you prepare for the exercise you “INHALE”....when you are doing the exercise you “EXHALE” if you have a trainer , we will help you synchronize this so you don’t choke. 


Here are 5 exercises form the 10 I will explain to you. So important points to consider : The wider or closer of your feet in the standing position will make the exercise hard or extra hard, The closer or away of your body with your feet from the point where the “TRX” is situated will also make more lever against the gravity of your body weight, Your arms and the position of this ones close to your ribs will be intense and your arms locked and above your head will be super hard. Ready??? let’s get to it!!.


1.- “TRX SQUAT both feet in the ground”.As you see in the image start first going back to tense the TRX(remember can’t be loose), you will have to position your legs wider than your hips, rehearse how far you have to go and do a test to make sure that when you squat your knees never pass the front of your shoe(INHALE), keep back straight and play with your body weight leaning your body back and working against the gravity when you come up and down(EXHALE).. If you want to have an intense 


WORK IN YOUR BUTT with the help of the “TRX” YOU CAN DO IT, just make sure your knees are facing outwards as you squat down. Start with 20 reps 3 sets. See image #1 
2.-”TRX SINGLE LEG squat one feet out of the ground”.Starting Position, again look at my posture, here your legs are closer, one is flexed and your knee is again in a vertical line situated for your ankle. again go back and make the TRX tense, as you BREATH lift one of your legs fully extended keeping your back straight and feeling the pulling of the TRX IN YOUR ARMS, abs sucked in and now imagine you are sitting in a chair so stick your butt out and slowly go down 90 degrees(EXHALE) squeeze your abs push your body up to the Starting position. 3 sets of 10 reps in each leg, no more cause stresses the knee.See image #2.


3.-”TRX” CHEST.Starting position,look at my posture,put your feet as wide as your hips and situated little more in front of where you see me in the image, position your your body in a straight line and your hands steady close to your shoulders and your nipples arms flexed and squeeze your ABS (INHALE)this is already HARD!!,now as you STRAIGHT your arms squeeze the chest and feel how the gravity is making your chest work like Crazy, slow come back to start position. (EXHALE).3 set of maybe 15 to 20 reps. See image #3.


4.-”TRX” TRICEPS.Starting: put your feet close and situate them as you see me in the image, half way between standing and plank, elbows up at the level of your shoulders and hands close to your ears arms flexed (INHALE), as you squeeze your abs you will extend your arms and to fully straight your arms working out gravity to hit the TRICEPS muscles(EXHALE) slow come back to start position. (EXHALE).3 set of maybe 15 to 20 reps. See image #4.


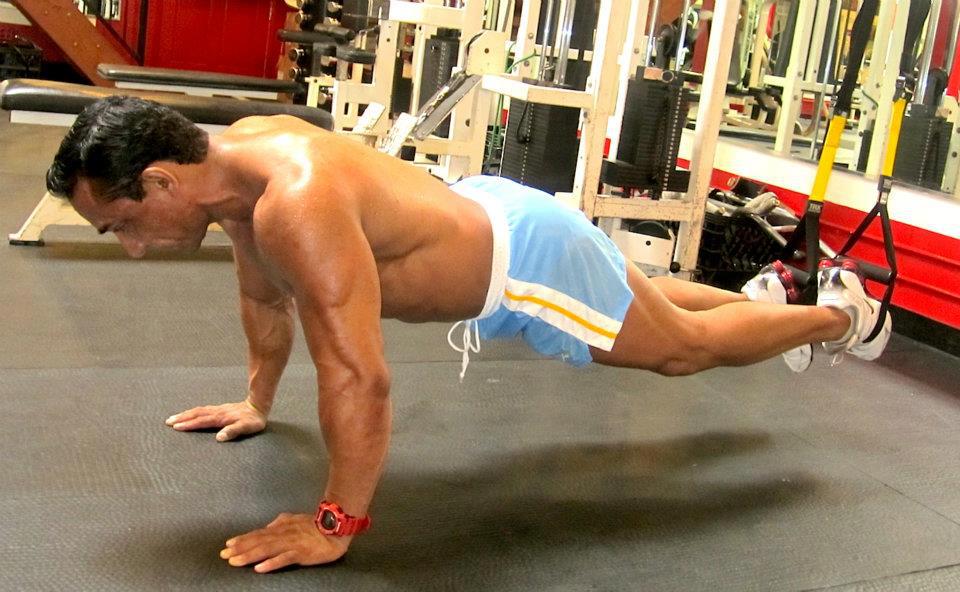
5.- “TRX” PLANK for abdominals. Starting position see my posture, put your feet on the straps of the TRX, keep you hands in front of your shoulders arms fully extended squeeze your abs and keep your body totally flat and straight hold this for 20 seconds 3 times. See image #5.


I will do a YOU TUBE CLIP for this month column to help you see and understand this movements so please go to my FACEBOOK : TU ENTRENADOR OCTAVIO.
Thanks so much to Tony Wiseniewski owner of ULTRABODYFITNESS GYM.http://ultrabodyfitness.com/ for using his gym for this pics.

Blessings Octavio.


------------------------------------------------------------------


“TRX”2012 EL MAS INOVADOR ENTRENAMIENTO PARA MOLDEAR UN CUERPO ATLETICO Y FUERTE PARTE 1.


Hola mis queridos lectores!!..estoy muy emocionado de compartir con ustedes este equipo llamado ‘TRX” Entrenamiento de Suspencion http://www.trxtraining.com/ el cual nos ha fascinado como ENTRENADORES y fanaticos de el ejercicio llevandonos a un nivel mas Alto de Condicon fisica. Yo aprendi este Tecnica el ano pasado en la “Convencion Mundial IDEA de Entrenadores” http://www.ideafit.com/ la cual se celebra anualmente, aqui ENTRENADORES tomamos estas certificaiones y apreder lo MAS ACTUAL en sistemas de entrenamiento para mejorar el nivel Atletico de nuestros clientes,este proximo 4 de julio 2012 estare en San Diego y les traere lo mas reciente de el mundo de el Ejercicio.El “TRX” tiene “3 FACTORES” fundamentales en su ejecucion, PALANCA, GRAVEDAD Y BALANCE. Estas 3 variables haran de tu entrenamiento INTENSO y divertido a tu conveniencia!!. Te advierto que este Programa te movera el TAPETE,no hay manera de hacer Trampa ya que tienes que echarle el 100% de esfuerzo y atencion,cuando LO HAGAS veras que haste el “Espiritu Santo” se te aparece antes de desmayarte.

Existen REGLAS que se tienen que seguir al hacer este entrenamiento. 
1.-NUNCA DEJES FLOJAS LAS TIRAS de el “TRX” en el empiezo o termino de cada ejercicio.
2.-Tus ABDOMINALES siempre deben de estar contaridas para mantener tu espalda derecha y tener BUENA POSTURA en tus ejercicios.
3.-Tu RESPIRACION es muy importante!,siempre que te preparas para el ejercicio “RESPIRAS” y cuando efectuas o terminas el ejercicio “EXHALAS” claro que si tienes un entrenador nosotros te ensenamos a sincronizar esto para que no te ahogues.
He aqui 5 de los 10 ejercicos que te explicare.Hay que considerar puntos importantes al empezar: el pisar con los pies JUNTOS o SEPARADOS haran tu ejercicio de INTENSO a SUPER INTENSO. La posicion de tu cuerpo mas Lejos o CERCA de el punto en donde esta colgado el “TRX” hara que tengas mas PALANCA EN CONTRA DE LA GRAVEDAD del peso de tu cuerpo.Tus brazos y manos mas CERCA de tus costillas o LEJOS asi como su estiramiento hara subir la INTENSIDA de tu ejercicio.Estas listo?? aqui vamos!!!.

1.-”TRX” SENTADILLA con los pies en el piso. Posicion de inicio, como ves en la imagen empieza echandote hacia atras para tensar las tiras del “TRX” (acuerdate que nunca deben de estar flojas), posiciona tus piernas un poquito mas ancho de tus caderas,ensaya y prueba una vez tu posicion y cuando hagas la sentadilla cuida de que tus rodillas no pasen la punta de tus tenis(RESPIRA), manten tu espalda derecha en todo momento y avienta tu cuerpo hacia atras para que trabajes en contra de la gravedad al subir y bajar a tu sentadilla(EXHALA).Si deseas una SUPER SENTADILLA y trabajar al maximo tu GLUTEOS baja lo mas que puedas ayudandote con el “TRX” asegurate que tus rodillas al bajar tanto esten dirigidas hacia AFUERA de tu cuerpo.Haz 20 reps. 3 veces.Ver imagen #1.


2.-”TRX” DESPLANTE con un pie levantado. Posicion de inicio,mira mi postura en la imagen,mueve tu cuerpo hacia atras para tensar el “TRX”,aqui tus pies y piernas estan juntas,el SQUAT con una pierna empezara al levantar una pierna estirada(RESPIRA) y la pierna y rodilla que esta en el piso se flexionara 90 grados como si te estuvieras sentando en una silla, cuida que tu rodilla al bajar no pase la punta de tu tenis(EXHALA), al bajar y subir manten tu espalada DERECHAy tus brazos completamente extendidos, abdominales apretadas.Haz 10 resp cada pierna ya que si haces mas lastimaras tu rodilla,haz esto 3 veces.Ver imagen #2.


3.-”TRX” PECHO.Posicion de inicio: ve mi postura,pon tus pies abiertos casi al ancho de los hombros y situate mas adelante de como me ves en la imagen,espalda derecha y brazos flexionalos cerca de tus hombros o pezones manteniendo la tension en el pecho(RESPIRA),ahora aprieta el pecho y estira los brazos poco a poco para estimular el pecho y esrtira completamente los brazos sintiendo intenso el peso de tu cuerpo gracias a la graveda e inclinacion de el “TRX”(EXHALA).3set de 20 rep. 20 reps 3 sets,Ver imagen #3.


4.- “TRX” TRICEPS. Posicion de inicio. Pon tus pies JUNTOS y SITUATE como me ves en la image entre colgado y medio parado,con tus brazos y codos arriva del el nivel de los hombro y flexionados (RESPIRA), ahora Espalada estirada, estira los antebrazos apretando tus triceps y abdominaleshasta extender tus brazos al frente y plamas de las manos hacia afuera J(EXHALA), REGRESA A BRAZOS FLEXIONADOS como en la posicion de inicio PARA ESTIMULR LOS TRICEPS.y sentiras el ardor DE ELLOS. Haz 20 reps 3 veces.Ver imagen #4.


5.- “TRX” PLANCHA para abdominales. Posicion de inicio por favor ve mi postura, pon tus pies en las agarraderas al final de cada tira(RESPIRA) “TRX”arodillado y luego vamina hacia adelante para levantarte de el piso con espalda super ‘RECTA Y ABDOMINALES APRETADOS’Mnso deben estar estiradas y al nivel de los hombros, HOLD this and SQUEEZE your ABS 20 seconds 3 times.Ver imagen #5.


Hare un clip en YouTube para que veas mas acerca de esta rutina asi que por favor DIRIGETE A MI FACEBOOK: TU ENTRENADOR OCTAVIO.

Muchas gracias a Tony Wiseniewski dueno de ULTRABODYFITNESS GYM.http://ultrabodyfitness.com/ por usar sus intalaciones para esta publicacion.
Bendiciones Octavio.

Friday, June 1, 2012

JUNE ARTICLE 2012


THE FOAM ROLLER THE MAGIC TOOL TO GET YOUR SIX PACK AND AVOID PAIN IN YOUR BACK.


https://www.facebook.com/media/set/?set=a.10150861970087253.406461.573012252&type=3
Hello my dear readers I can believe all these months I had not show you the best little equipment that you have at your gym that  Definitely “YOU SHOULD BUY ONE’. The “Foam Roller” is that cylinder  that you see all dirty and squeezed in  dirty corner at your gym.Well I want to Educate you how magnificent and extraordinary tool you have there to do an AMAZING abs workout incorporating Balance and Coordination and also the Ultimate STRETCH FOR YOUR SORE BACK AND LOWER BACK. Please make sure this cylinder is not the Soft one cause it gets ruin faster and if you are heavy it won’t hold your weight so get the most tuff one,look at the images below and look that the roller am using, is the big one your “Head and Gluts” can be supported on it. So here are the instructions: LAY ON YOUR BACK  in the middle of the roller, open your ams to side so you play with your BALANCE,keep your lower back flat on the roller, head and tailbone always  in the roller, bring BOTH LEGS Up and pointing tight up and out here we go!!!! ..by know you are felling the ABS  workout.

1.- F. ROLLER starting positing.Lay in the middle of the roller, your feet are still touching the ground, open your arms to balance and stop the movement of the roller.Bring 1 leg up!...Breath again bring other leg up!!!, now lift your shoulders  a little chin close to the chest and squeeze ABS!!!......Hold for 25 counts both legs first.THIS IS NOT EASY and LOOK AT THE IMAGE!!!!


2.- F. ROLLER/ RIGHT leg down HOLD 20 COUNTS/ bring the right UP  and now put LEFT DOWN. Legs are fully straight and pointing like a ballerina,YOUR ABS WILL BE ON FIRE ALREADY.do both sides 20 holding counts.


3.- F.ROLLER same position BICYCLES  now ONE LEG GOES straight forward and the other one is flexed and pointing all the time and close to the knee (PLEASE SEE MY POSTURE) YOUR HEAD IS STILL UP and you are doing movements with your legs like if you where on a bike. 40 counts and BREATH!!!


4.- F.ROLLER lower ABS  and ADDUCTORS. Please look at my posture, your legs will be open as wide as you can, WIDE AND POINTING(INHALE) and use as a reference to keep your legs “long and straight” thinking that you BIG TOE IS THE ONE PULLING OUTWARDS TO KEEP IN ALL TIMES YOUR LEGS FULLY STRAIGHT , assume de position and hold for 20 sec, you will be starting to fell the adductors,now CLOSE THE LEGS AND BRING YOUR HEAD AND UPPER BODY UP to do the crunch(EXHALE). So again lay your back and head down resting on the roller with your legs OPEN and repeat  the crunch with your back and head out of the roller and closing the LEGS again.YOU WILL BY CRYING with this abs.


5.-F.ROLLER OBLIQUES.Please see my posture, right arm is on my head which will be the one lifting and twisting to the opposite  leg in this case LEFT twisting the torso and elbow toward the left knee, the LEFT ARM HAS TO BE STEADY to balance the movement.RIGTH LEG HAS TO BE ON THE GROUND Flexed and the LEFT LEG has to be in all times fully  straight and pointing with the toe to elongate the leg. Then alternate and do 20 counts the other side.


6,F.ROLLER SPINAL SIDE STRETCH.
The relive we all need.Look at the image and position your body right above your waist and it is going to hurt you because that muscle is supper TIGTH!!!. So don’t cry, take a deep BREATH AND MOLD YOUR SPINE ON TOP OF THE ROLLER, keep your body as you see in the image, long and extending the ARMS and LEGS....THIS STRETCH IS SOOOO GOOD!!!!. 
This stretch will HELP YOUR LOWER BACK feel away from the EVIL pain we all suffer.


I will do a YOU TUBE CLIP for this month column to help you see and understand this movements so please go to my FACEBOOK : https://www.facebook.com/pages/TU-Entrenador-Octavio/165080336837285?fref=ts
Thanks so much to Tony Wiseniewski owner of ULTRABODYFITNESS GYM.http://ultrabodyfitness.com/ for using his gym for this pics.

Octavio.
http://www.octaviosfitness.com/
http://octaviofitness.blogspot.com/
----------------------------------------------------------------------------------------------------


EL RODILLO DE PILATES LA HERRAMIENTA MAGICA PARA TENER TU ESTOMAGO DE LAVADERO Y EVITAR DOLOR EN TU ESPALDA.


https://www.facebook.com/media/set/?set=a.10150861970087253.406461.573012252&type=3
Adelante Junio 2012.
Hola mis querido lectores no puedo creer que no les haya compartido este aparatito que tienes en tu gym y el cual “DEFINITIVAMENTE DEBES DE COMPRATE UNO”. El Rodillo de Pilates es aquel cilindro que ves aventado en una esquina de tu gym cochino y apachurrado.Bueno pues quiero educarte a que este cilindro es una magnifica y extraordinaria herramienta con la cual puedes realizar UN EXCELENTE TRABAJO DE ABDOMINALES incorporando Balance y Coordinacion ademas de ser lo mas Inovador para ALIVIAR TU DOLOR DE ESPALDA BAJA Y ESTIRARLA. Por favor asegurate de que compras y use el cilindro duro, NO SUAVE ya que se aplasta rapidamente y si estas pesadito no te ayudara a estimular las fibras musculares, mira  en las images el rodillo que utilizo, siempre los mas DUROS son de color negro,el tamano es el “mas grande” ya que tu Cabeza y tus gluteos deben estar soportados en el mismo.Asi es como debes de utilizarlo: Acuestate y coloca el rodillo a la mitad de tu espalda cuidando que tu cabeza este adentro de el cilindroencuentra el balance y abre tus brazos para que no te muevs demasiado, manten tu espalda baja en el rodillo sin arquerla,Piernas semiflexionada tocando el piso. LISTO? ahora levanta una pierna bien estirada y en punta(aprieta tus abdominales) ahora sube la otra y mantenals juntas....SIENTE QUE YA TUS ABDOMINALES ESTAN EMPEZANDO A TRABAJAR.

1.- RODILLO posicion de inicio.
Como mencionamos acuetate en el rodillo y acomoda tu cuerpo, pies tocando el piso y abriendo os brazos tocando el piso para darte el balance. Levanta 1 pierna estirada y en punta!!!...Respira ahora sube la otra!!,ahora cuidadosamente levanta tus hombros y espalda afuera de el rodillo con tu barbilla pegada a tu pecho para activar tu abdominales y APRIETALAS, MANTEN TUS PIERNAS JUNTAS Y ESTIRADAS POR 25 CUENTAS.Este ejercio es dificil asi que concentrate.


2.- RODILLO /PIERNA DERECHA  abajo sostenla 20 cuentas , IZQUIERDA arriba sigue estirada/ AHORA baja la pierna IZQUIERDA y sube la DERECHA, 20 CUENTAS CADA PIERNA Y YA ESTAS SINTIENDO MAS INTENSO ESTOS EJERCICOS!!!!.


3.-RODILLO haciendo BICICLETA.
Haciendo bicicletas.Ahora una de tus piernas la estiraras completamente puntanto tu pie y la otra estara flexionada cerca de la rodilla(Por favor mira la imagen para copiar mi postura)  tu cabeza esta aun levantada con tu barbilla pegada a tu pecho y tus piernas las moveras como si estuvieras haciendo bicicleta, cuenta 40 pedaleos aprieta el abdomen y Respira controlado.


4.- RODILLO ABDOMINALES BAJAS y ADUCTORES.
Trabajando abdominales bajas y aductores en las piernas.Por favor mira mi postura,levanta las piernas y abrelas hasta donde puedas, ESTIRALAS Y PON TUS PIES UN PUNTA(respira) par que hagas bien este ejercicio imagina que alguien te esta JALANDO LA PIERNA DE EL DEDO GORDITO DE TUS PIES PARA MANTENER TUS PIERNAS SIEMPRE ESTIRADAS, sosten esta posicion por 20 segundos y sentiras los musculos aductorea de tus piernas, AHORA CIERRA Y JUNTA LAS PIERNAS Y LEVANTA O DESPEGA TU ESPALDA DE EL RODILLO PARA EFECTUAR LA ABDOMINAL AL MISMO TIEMPO QUE CIERRAS LAS PIERNAS( EXHALA), ABRE LAS PIERNAS OTRA VEZ Y REGRESA TU ESPALDA AL RODILLO, repite esta accion 20 veces y sentiras que TU ABDOMEN ESTA EN LLAMAS.


5.- RODILLO PARA TRABAJAR OBLICUOS.
Por favor mira mi postura en la imagen.el brazo derecho y mano  esta en mi cabeza y sera el que estaremos torciendo y levantando haciala pierna opuesta en este caso la izquierda torciendo completamente TU TORSO dirigiendo el codo de este brazo hacia la rodilla de la pierna izquierda para trabajar el oblicuo , EL BRAZO IZQUIERDO Y MANO estaran tocando el piso para mantener tu balance. LA PIERNA DERECHA Y PIE ESTARAN firmes y tocando e piso(flexionada) mientras que la PIERNA IZQUIERDA SE MOVERA SIEMPRE COMPLETAMENTE ESTIRADA y como mencione antes imaginando que te JALAN DE EL DEDO GORDO DE EL PIE para sentir el estiramiento de la pierna. 20 reps. cada lado.


6.-RODILLO PARA ESTIRAR LATERALMENTE LA ESPINA DORSAL. 
Este es el estiramiento que nos dara alivio en nuestra espalda y cintura.Mira la image y posiciona tu cuerpo como en la imagen, mas o menos arriba de la circunferencia de tu cintura, RESIRA y deja que tu cuerpo MOLDEE el rodillo y estira los brazos y piernas como en la imagen para sentir el estiramiento de cintura y espalda, este estiramiento duele un poco ya que esta parte de el cuerpo es muy tiesa pero AGUANTATE SE SIENTE BIEN RICO al estar unos minutos encima de el rodillo. Este estiramiento AYUDARA A ALIVIAR ESE MALDITO DOLOR  de espalda y cintura que todos sufrimos.


Hare un clip en YouTube para que veas mas acerca de esta rutina asi que por favor DIRIGETE A MI FACEBOOK: https://www.facebook.com/pages/TU-Entrenador-Octavio/165080336837285?fref=ts

Muchas gracias a Tony Wiseniewski dueno de ULTRABODYFITNESS GYM.http://ultrabodyfitness.com/ por usar sus intalaciones para esta publicacion.
Blessings.
Octavio.
http://www.octaviosfitness.com/
http://octaviofitness.blogspot.com/

Tuesday, May 1, 2012

MAY ARTICLE 2012

“POSTURAL CORRECTIONS IN YOUR BACK WORKOUT WITH HAMMER MACHINES 2012”


Hello my dear readers!! as always hope your “overall health is improving” and you are more careful and the way you workout and you avoid getting hurt going to the gym.This time I want to help you in your workout with machines at the gym, this time I will Focus in your “BACK” exercises.Most of the people think that just sitting in this machines “pulling or pushing” are going to make the “magic” of get you a Bigger Back or other Muscles just because is no brain to move the machine somehow, which is not truth. The way you position your all “body and breathing” has an important part in really “working out” with machines a success in your physique and the muscles you are doing. All the time “I see people” doing TONS of weight,not controlling speed , wrong and small range of motion of your arms, no isolating the back muscles, breathing backwards and moving all the body like a Crazy person trying to move the machine over to the floor.In all Back Exercises you Starting Position will be with your “arms fully extended felling the full stretch of your back”, so when you are in the machines you HAVE TO ADJUST the sit, this full stretch as starting position will give the Full Range of Motion that you have to perform in order to “work properly your back”, your CHEST will be either resting or touching the cushion of the machines to help you keep you back straight and isolate the muscle you are working out,position as well your head looking forward and maintain this in all times during the exercise, this is the moment you INHALE. Ending position “You will bring both hands that are grabbing the handles of the machines close to your upper body, either close to your chest or on the side of your lats trying to squeeze the muscles of you back or lats and maintaining you posture with your back straight and ABDOMINALS contract “EXHALE”.return to starting position fully extending your arms to feel the stretch again and then repeat.If you put TO MUCH WEIGTH you won’t be able to this exercise correct if you can’t control it PUT LESS WEIGTH “DON’T SHOW OFF”, this is not helping your back muscles to get bigger , why training like a “CAVE MEN”??...better Train Smart and look good.Here are 4 Hammer Machines that are in all gym and the way you supposed to used them:


1.- High Grip Hammer Machine.
Adjust the sit and make sure you start with your arms fully extended, chest in the cushion, back straight, look forward INHALE (see the image), as you bring the handles close to your chest make sure your back is straight and abs tight EXHALE squeeze your back muscles, now extend the arms again and fell the stretch in your arms and back muscles, repeat.4sets x 20 reps. (see image #1).


2.- Lower Grip Hammer Machine.
Adjust the sit and make sure you start with your arms fully extended, chest in the cushion, back straight, look forward INHALE (see the image)as you bring the handles close to your Ribs make sure your back is straight and abs tight, feet steady and wide open for better support EXHALE squeeze your Lats, shoulders back chest out, repeat.4sets x 20 reps.(see image #2).


3.- Over Head Wide Grip Hammer Machine.
Adjust the sit as if you where sitting in a chair and make sure you start with your arms fully extended, here you have also adjust the lock for your quadriceps so you don’t move (see the image), start with your arms fully extended, chest out and squeezing your abs to KEEP YOUR BACK STRAIGHT as possible since there is not support for your chest INHALE,as you bring the handles “vertical down” keep your head looking FORWARD, do not bring your HEAD BACK OR DOWN, this will cause you A NECK or SHOULDER PINCH that will hurt you for days, this is the exercise that “I SEE EVERYBODY” doing awful,your hands will down at the level of your shoulders EXHALE,squeeze your abs and back muscles, repeat.4sets x 20 reps.(see image #3).


4.-Incline open grip Free Weight Hammer Machine.
Another exercise that 90% of the people do WRONG specially of you are Tall. Here the “Starting Position” is very important to understand and position your body correct for both grips, open or close.PLEASE see the image, please take1 minute to observe. Position you body in the TOP PART of the cushion making sure that the your “nipples and middle chest” are well supported(see the image), your arms fully extended KEEP YOUR BACK STRAIGHT as possible, the machine has a floor that for SMALL people is ok so we don’t stick out of the machine to much, TALL people you may have to step outside of this floor and adjust your body maybe flexing or squatting your body to get in the starting position INHALE, as you bring the handles close to your chest make sure your back is straight and abs tight, feet steady, do not bring your HEAD BACK OR DOWN, this will cause you A NECK or SHOULDER PINCH squeeze your abs and back muscles, repeat.4sets x 20 reps.(see image #4)


I will do a YOU TUBE CLIP for this month column to help you see and understand this movements so please go to my FACEBOOK : TU ENTRENADOR OCTAVIO.


Thanks so much to Tony Wiseniewski owner of ULTRABODYFITNESS GYM.http://ultrabodyfitness.com/ for using his gym for this pics.


Blessings Octavio.


--------------------------------------------------------------

“CORRECIONES POSTURALES EN TU RUTINA DE ESPALDA CON MAQUINAS HAMMER 2012”


Hola mis queridos lectores!!! espero que su salud general este mejorando y que estes mas consiente de ser cuidadoso al efctuar tu rutina de ejercicio para evitar que te lastimes.Esta ocasion quiero ayudarte en como trabajar con maquinas tu ESPALDA. La mayoria de la gente piensa que solo por sentarte y jalar o empujar las agarraderas de estas maquinas hara la magia de hacer crecer tus musculos pensando” Que tanta Ciencia es al mover la maquina”, lo cual no es tan simple,estos movimineots tienen su chiste para que te trabajen corretamente los musculos de la Espalda. La manera en la Posicionas tu Cuerpo, la manera en que Respiras son clave para cuando utlizas estas maquinas. todo el tiempo veo Gente en estas maquinas con DEMASIADO PESO, no controlando la velocidad de el ejercicio,no estirando completamente los brazos por lo cual el Rango de Movimiento es inadecuado,no aislando el musculo correcto y respirando al reves y pues basicamente haciendo cosas LOQUISIMAS e inseguras casi casi como tratando de voletar la maquina al piso.

En todos los Ejercicios de Espalda tu Posicion de Inicio empezara con tus brazos completamente estirados sintiendo como se Estira tu Espalada, tendras que ajustar el asiento para que realizes completo Rango de Movimiento jalando y estirando completamente tus brazos,tu PECHO estara soportado o pegado al cojin de la maquina para mantener tu espalda DERECHA aislando correctamente el musculo que trabajas, tu cabeza importante mantenerla NEUTRAL sin aventarla mucho hacia adelante o hacia atras en este momento RESPIRAS. Tu Posicion de terminacion de el ejercicio sera a acercar tus manos las cuales estan agarrando los brazos de la maquina hacia tu pecho a torso apretando los musculos de la Espalda y los ABDOMINALES manteniendo tu espalda derecha EXHALANDO luego estirando los brazos completamente a al posicion de inicio repetiendo la accion controlada y respirando profundo y controlado.Si pones DEMASIADO PESO y no controlas el completo Rango de Movimiento NO estas haciendo correctamente el ejercico, NO QUIERAS APANTALLAR A LOS DEMAS, hace anos que se dejo de entrenar como HOMBRE DE LAS CAVERNAS, ahora se entrena siendo listo e informado para obtener los mejores resultados corporales.


He aqui 4 Ejercicios de Espalda con Maquina Hammer que hay en los Gyms y la manera de como debes realizarlos:
1.-Agarre Abierto con Maquina Hammer.
Posicion de Inicion, ajusta el asiento primero para que tus brazos esten completamente estirados,tu pecho tocando el cojin de la maquina, endereza tu espalda, vista al frente,NO muevas tu cabeza RESPIRA (mira la imagen), al acercar tus manos agarrados de los brazos de la maquina hacia tu pecho asegurate de que espalda esta completamente derecha EXHALANDO y apretando tus musculos de la Espalda y ABDOMINALES “terminacion de el ejercicio”, regresa tus brazos estirandolos a la posicion de inicio y repita la accion.4 sets de 20 reps.(ver imagen #1).


2.- Agarre Bajo con Maquina Hammer.
Posicion de Inicion, ajusta el asiento primero para que tus brazos esten completamente estirados, tu pecho tocando el cojin de la maquina, endereza tu espalda, vista al frente,NO muevas tu cabeza RESPIRA (mira la imagen). Terminacion de el ejercicio: al acercar tus manos agarrados de los brazos de la maquina hacia tus costillas asegurate que tus pies esten pien plantados en el piso EXHALA aprieta tus Dorsales y ABDOMINALES manteniendo tus hombros echados hacia atras y tu pecho afuera,regresa tus brazos estirandolos a la posicion de inicio y repita la accion.4 sets de 20 reps.(ver imagen #2).


3.- Agarre Abierto Arriba de la Cabeza con maquina Hammer.
Posicion de Inicion, ajusta el asiento primero para que tus brazos esten
completamente estirados,aqui ademas tienes que ajustar el cojin que detiene tus piernas para que no te muevas(ver la imagen),aqui ya que no tienes el cojin para poner tu pecho tienes que MANTENER TU ESPALDA DERECHA todo el tiempo RESPIRA. Terminacion de el ejercicio: ahora baja los brazos de la maquina verticalmente hacia los lados de tu torso y hombros manteniendo tu vista y cabeza mirando al frente sin echarla hacia atras o adelante demasiado ya que puedes PINCHAR un musculo del CUELLO y HOMBROS provocandote un DOLOR por dias,aprieta tus musculos de la Espalda y Abdominales EXHALA, regresa tus brazos estirandolos a la posicion de inicio y repita la accion.4 sets de 20 reps.(ver imagen #3).


4.- Jalon de Espalda con Soporte Inclinado en Maquina Hammer.
Aqui el 90% de las personas que veo hace este ejercicio tan mal que me da escalofrios al ver como se lastiman el cuerpo especialmente la gente alta. Aqui la posicion de Inicio es crucial para no lastimarte y hacer bien el ejercicio asi que pongan atencion: tu PECHO estara soportado en el cojin hasta al nivel de tus pezones o mitad de el pecho para mantener derecha la espalda y correcta la postura (mira la imagen)DETENIDAMENTE, tus brazos son completamente estirados y con codos y manos abiertas RESPIRA, la maquina tiene un piso o pedestal el cual para la gente pequena como yo esta perfecta, para la gente alta tendras que sacar tus pies afuera de este pedestal o hacer como que haces un Squat para ajustar tu posicion de inicio, ahora acerca tus brazos a tu Torso apretando musculos de la espalda y abdominales manteniendo tu cabeza NEUTRAL sin echarla hacia atras o adelante demasiado ya que puedes pinchar y lastimar un Nervio Cervical EXHALA, regresa tus brazos estirandolos a la posicion de inicio y repita la accion.4 sets de 20 reps(ver imagen #4).


Muchas gracias a Tony Wiseniewski dueno de Ultrabodyfitness.com.http://ultrabodyfitness.com/ por utilizar suy gym para estas fotos.

Encuentra mas detalles de este articulo en mi facebook; TU ENTRENADOR OCTAVIO
Blessings Octavio.

Sunday, April 1, 2012

APRIL ARTICLE 2012

“IMPROVE YOUR POSTURE AND AVOID LOWER BACK PAIN WORKING YOUR LOWER BACK ,OBLIQUES AND ABS APRIL 2012”


ENGLISH ARTICLE:
Hello my dear readers! hope you are felling good and ready to continuing improving your health and well being. This time I want to tell you how important is to pay attention to your body and what he tells you when a pain comes suddenly, one of the common pain that we all Suffer is the Syndrome of Lower Back Pain and Sciatica
Lower back pain can make life very difficult and the simplest tasks extremely hard to complete.There is a wide and varied range of factors and conditions that can contribute to this issue such as:
Overuse ( you don’t have idea “what the heck you are working out” or don’t have a planned routine in your workouts)
Strained muscles( specially for lack of warm up and do lots of weight in the first set)
Strained ligaments ( when you use a lot of weight and over stretch a joint).
Trauma ( break a muscle or a ligament).
Sciatica (lack of warm up and back technique doing Squats or Sitting for long periods of time with our stretching).
Unfortunately, in many cases, lower back pain can be a symptom of a more complicated issue that may get more painful and serious over time. When an area is tense, it is generally more likely to sustain further or additional injuries from less effort, and then the issue can be made worse. Healthy muscles are then overly used to offset the inability to use the damaged area, which compounds the problem even further. For example all of us are so Focus in “the Abdominals” but never pay attention to the opposite muscles (lower back) which makes our core stable and strong,and improves our posture along with working out properly upper body muscles to improve 100% our all body alignment. For this you need a Knowledgable Trainer to give you a routine for posture and alignment.
The sciatic nerves are the longest nerves in the body, which branch out from the spine, across the buttocks, over the hips and down the back of the thighs. The term sciatica refers to pain that can radiate in these areas, but should not be confused with a disorder, as it is only a set of symptoms. Sciatica can indicate that there are underlying issues having to do with back 
muscles, the spine or the nerve itself,Sciatica is often felt more on one side of the body or the other and can be worsened by sitting for long periods of time and can make it painful to complete simple tasks. Some of the common symptoms associated with sciatica are:
Pain in the lower back, hips and thighs that can be mild to severe and sharp
Numbness in legs or feet
Tingling in legs or feet
Here are some Core and Lower Back Strength exercises that I want to share with you to help you improve your posture and avoid The pain in both.Meaning you have to do it both in your Exercise Program.

1.-The View of Muscles involved in your Back and Lower back.
This first image shows you in the white colors the muscles that are involved in the pain and the areas in your all back and in your lower back and gluts. (see image #1).


2.- Extension of the legs on the resist a ball to strength your lower back.
Please position your body as you see in the image, arms locked and wide apart to hold your upper body, in the exercise you will maintain your pubic bones in the ball and you will move your legs totally straight moving from the hips to the toes up and down squeezing your butt with a control speed to strength your lower back muscles.(see image #2).


3.- Roman Chair Lower Back strength.
We all know this machine but the problem is the way you position your body, make sure when you are down your navel is above the cushion so your waist and upper body can go up and down correct, you start down(inhale) and when you bring your upper body up( exhale) your hands are in your head elbows open as you see in the image to give you perfect posture you will squeeze your abs.(see image #3).


4.- Advanced Core lifting of the gluts with toes on the resist a ball.
Hands wide apart and locked ( look at the position of my body in the image), you have to start the exercise with your toes almost the middle of the ball and the bring them to the middle lifting your gluts towards the ceiling and moving the ball close to your hands like a hand stand.
(see image #4).


5.- Side Obliques on the Ball.
Here your body will be resting side ways in the glut and waist (inhale) make sure your feet are open to give you stability to perform the later flexion of your spine or torso PLEASE LOOK AT THE IMAGE, hands on your head and open, bring your torso side ways up squeezing the obliques(exhale).


Thanks so much to Tony owner of ULTRABODYFITNESS GYM.
http://ultrabodyfitness.com/ for using his gym for this pics.
Octavio.

--------------------------------------------------------------

“MEJORA TU POSTURA PARA EVITAR EL DOLOR DE ESPALDA BAJA FORTALECIENDO TU ESPALDA,OBLIQUOS Y ABS 2012”.


Hola mis queridos lectores que se sientan bien y continuemos nuestro camino a mejorar nuestro bienestar y salud fisica. Este es el momento en cual quiero mencionarte que tan importante es poner atencion a lo que tu cuerpo te dice cuando te aparece un dolor en el cuerpo repentinamente, uno de los dolores mas comunes que padecemosel el Sindrome de la Espalda Baja y la Siatica.
El dolo de la espalda baja puede ser muy molesto y desgardable haciendo solo actividades diarias imposibles en algunos casos de realizarlas. Existen una gran varidead de factores y condiciones que pueden contribuir a estos dolores tales como:

Abuso de el ( trabajo muscular) la persona que no tiene las minima idea de que carambas esta trabajano en cada maquina o ni siquiera tiene una rutina de su workout.
Desgarramiento Musculares (especialmente debido a la falta de calentamiento y utilizando muchisimo peso un las primeras repeticiones).
Desgarramientos de ligamentos ( cuando pones demasiado peso y sobre estiras el ligamneto de el musculo trabajado).
Trauma (rompimiento de el musculo o ligamento).
Siatica ( falta de suficiente calentamiento al hacer squat con mucho peso lastimando la espina dorsal y por estar sentados largos periodes de tiempo sin estirar).
Desafortunadamente en muchos casos los sintomas de el dolor de espalda baja pueden tener mucha mas complicaciones si no las atendemos a tiempo.Al padecer estos dolores nosotros sobrecompensamos con otros musculos que estan sanos y pues otras implicaciones o dolores nos pueden salir. Por ejemplo todos nosotros el gym estamos obsecionados conn las abdominales pero nunca le ponemos atencion al musculo opuesto( la espalda baja) la cual en conjunto con nuestras abdominales y obliquos nos desarrolla unas abs fuertes, espalda erecta mejorando nuestra postura tambien mencionando que otros musculos de la parte superior se deben trabajara pero una perfecta postura al 100%.Para esto necesitaras la ayuda de u Entrenador Profesinal para darte una rutina que sea balanceada y especifica para alineamiento y postura.Los Nervios Siaticos son los nervios mas largos en el cuerpo,que se congregan hacia la espina, cruzandose ppr los gluteos, caderas parte trasera de la piernas o hamnstrings.El termino de Siatica se refirea cualquier dolor que pueda darse en estas areas indicando que existe alguna inflamacion en los miles de fribras musculares desde la espalda ,terminales nerviosas en la espina. La Siatica siempre la sentimos mas de un lado de el cuerpo y ser grabado por estar largos periodos de tiempo sentados y sintiendo desconmfort por no componer nuestra postura.
Alguno de los sintoma asociados con la Siatica snon:

Dolor en la espalda baja, caderas y muslos con dolores con una escala de dolor de minimo hastas inaguantable.
Adormecimiento en piernas y pies.
Cosquillitas o descargas electricas de nuestro cuerpo en piernas y dedos.

He aqui agunos ejercicios de fortalecimiento para mejorar to Centro de gravedad (abdominales) que quiero que los hagan en su rutina diaria de entrenamiento.

1.- Esta es in imagen de la espalda y los miles de musculos en blaco que estan envueltos en estos posblie doloros y desgarramientos que aparencen en espalda alata , baja, gluteos y hamstrings.(ver imagen #1).


2- Extencion y levamtamiento the piernas totalmente paralelas con la peloto para fortelecer tu espalda baja y glueos. Por favor posiciona tu cuerpo como me ves en la imagen, brazos totalmente estirados abiertos al ancho de tus hombros para sostener tu torso,en este ejercicio asegurate de que tu huesos pubicos estan descansando en al pelota,estiraras las piernas completamente y moveras ambas piernas siempre estiradas como las aletas de un delfin,sin dejar que caigan o toquen tus piernas el piso y levantandolas lo mas que puedas hacia arriba apretando tus gluteos y manteniendo el cuerpo horizontal sobre la bola, esto fortalecera tu espalda baja.(ver imagen #2).


3.- Silla Romana(espalda baja).
Todos hemos hecho esta maquina ya que posiciionamos mal nuersto cuerpo, aqui asegurate de al subirte a la maquina este ajustada a que tu hombligo salga de el cojin o proteccion para poder bajar comodamnete to torso(posicin de incio RESPIRA) y te levantes con los codos en la cabeza y abiertos el torso(EXHALE) apretando los gluteos
y deteniendote con tu cuerpo en una linea semivertical.


4--Levantamiento de caderas al aire para abdominales utilizando la pelota.
Manos separadas al ancho de hombros (ver la imagen) tu cuerpo estar totalmente estirado y la punta de tus bedos en la pelota , dirigiras la pelota hacia tus manos empujando con la punta de tus pies hacias tus manos al frente y utilizaras la contraccion de tus abs y el levantaminto de tus gluteos y caderas al aire pra sentir el ejercicio en las abdominlaes ( exhala).(veri imagen #4).


5.- Obliquos con el cuerpo de lado con la pelota.
Aqui tu cuerpo descansar lateral mente en la pelota, por favor acercate a una pared para que abras las piernas y las pongas semiabiertas para darte estabilidad al hacer la flexion lateral de la espina para trabajar obliquos con tus manos en la cabeza codos abiertos (respira) y cundo haces la contraccion lateral aprieta el oblicuo(exhala).(ver imagem #5).


Muchas gracias a Tony dueno de Ultrabodyfitness.com.http://ultrabodyfitness.com/ por utilizar suy gym para estas fotos.
Encuentra mas detalles de este articulo en mi facebook; TU ENTRENADOR Octavio.
Blessings
Octavio.

Thursday, March 1, 2012

MARCH ARTICLE 2012

CARDIO KICK BOXING WORK OUT #2 2012
GET YOUR ABS LEGS AND UPPER BODY A “ROCKY” LOOK!!.


Hello my dear Readers hope you got all well done my last workout!!!. Your level of endurance and Resistance will increased more and more if you do it consistently,
I want to Express to you how many CRAZY workouts are out there: Boot camps, 
PX - 90 WHATEVER and these INSANE AND MILITARY workouts that people try to sell you making you think that if you don get “HURT or VOMIT” you will never get fit, all this is just Crap, if you are a professional trainer and you are going to put your “obese or out of shape clients “ in this Trauma you are not professional you are just a joke. You have to prepare your client’s body for any kind of sport or activity from 0 and slow to 10 body and mind , wise hand in hand with the trainer’s expertise. You have to teach your body to understand why and how you are doing certain exercises, learn the technique and practice till you do the “exercise” perfect with out HURTING YOUR SELF. Believe me all the people in THESE VIDEOS are “already stage the performance and all of them are athletes” so they DO INSANE MOVEMENTS. That is why in this month I will teach you 5 KICK BOXING movements for you to learn and practice, with technique and detail in the body mechanics so you don’t twist your knee or brake your wrist punching or kicking.You can practice this with an imaginary Punching bag and gloves or if you have the chance to get “Gloves” the workout will be more Fun and hard, the equipment is chip to buy in BIG 5. Please use some clothes that stretch and not tight otherwise you will hear the crack of your “ripped clothes from your behind” doing the first kick.

“Put your gloves, leave the thumb up and close the 4 fingers close to your palms and the seal the fist putting the thumb on top of the index finger .knuckles strong and this will be the part you will use to hit the imaginary bag or target”. 

1.- Jab.
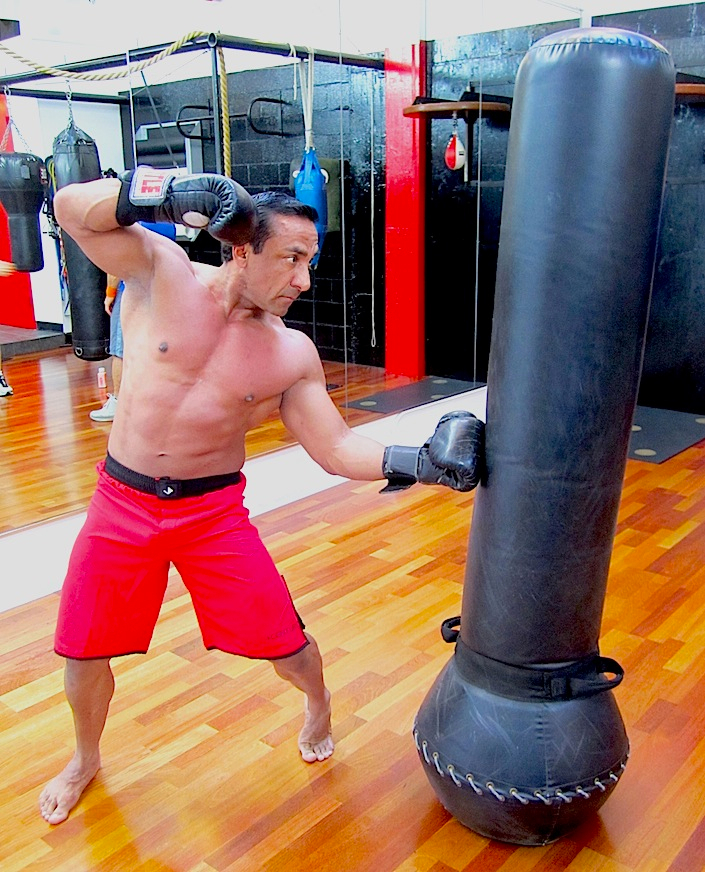
From standing fight position which is from “feet together you bring your hands flex doing a square and both gloves close to your ears and eyes” your arms will be the weapons to hit and protect your face if someone wants to hit you, STEP ONE LEG BACK, if you step right leg back your body will have the left arm and the left leg in front of your left eye CORRECT?...this LEFT arm will do the JAB straighten the arm to the target and still thinking you are hitting with the knuckles, reaching the face or the punching bag. your arm will be locked , upper body straight and ABS tight!!. your right arm still will be up and close to your face!!!Look at the image #1.


2.- Cross Punch.
We are still in standing position now you will swing your hips align to the bag and the right arm that is close to your right chick will cross punch and hit using also the power of both shoulders twisting to fully straighten right arm hitting with the knuckles Please see my posture in the image, abs tight and feet steady in the ground look image #2.


3.- Hook.
NOW you are still in standing fight position, you had done JAB with left arm, CROSS PUNCH with the right arm that was back from your standing position and now you will use again the left arm to do THE HOOK imagining that your arm will be a hook that will hit and start from under your ribs up facing the knuckles to the jaw of the person you are boxing. LOOK at the image and the way my body kind is crunching the abs and flexing lateral de spine. Image #3.


SO basically you are doing from standing position 3 numbers or punches ;
JAB LEFT ARM / CROOS PUNCH RIGTH ARM / HOOK LEFT ARM ...Get a little rhythm 1-2-3......hit 1 , hit 2 , hit 3. Read again my instructions before in the first 2 punches so you can master this 3 basic boxing movements.

4.- Front push kick.
This from standing fight position the leg that is on the back is the one that will perform the lifting of the knee and cuads as high as possible and you will hit with the ball of the feet like you where trying to push a door to crashed it. Your hands are still covering your face as I taught you before. Ideally the ball of the feet are hitting at the level of the navel use the power of your abs and body weight to push with all your strength,look at the image #4.


5.Side Kick.
Here the position to start is put your body next to the bag, now step aside 2 times, your feet will be wide as your hips , the leg that is close to the bag will be lift up flexed and then extended a side away from your hip and the middle line of your body trying to hip the middle of the bag or above the navel..not lower cause you will be hitting the “balls” of your partner and that is not aloud in this martial arts.Please look really in detail my posture in this image. You will keep your hands up protecting your face and the leg will be hitting with the HILL and FULLY STRAIGHT .look image #5.
“Master this movements with the left arm first and your fight position and legs and then switch your standing position where you step back left leg and you will start doing the JAB with the right arm, CROSS PUNCH left arm and hook again right arm. In the LEGS switch sides to alternate the legs”.

I will do a YOU TUBE CLIP for this month column to help you see and understand this movements so please go to my FACEBOOK : TU ENTRENADOR OCTAVIO.

Thanks so much to Tony owner of ULTRABODYFITNESS GYM.http://ultrabodyfitness.com/ for using his gym for this pics.

Blessings Octavio.

------------------------------------------------------------------

CARDIO KICK BOXING COMBO #2
DALE FORMA A TU PARTE SUPERIOR, ABS Y PIERNAS COMO LAS DE UN BOXEADOR.


Hola mis queridos Lectores espero que hayan realizado nuestro programa de ejercicio de el mes pasado!!!. Tu nivel de Resitencia y Condicion Fisica aumentara cada vez mas y mas si haces la haces constantemente. Hay tantos y tantos VIDEOS con rutinas Locas ,Militares, Boot Camps o PX 90 diciendote que hagas cosas FUERA DE LO HUMANO Y MOVIMIENTOS MUY INSEGUROS lavandote la cabeza de que solamente llevandote al VOMITO o DOLOR EXTREMO esto dara la bajada de peso y te dara el cuerpazo lo cual ES PURA BASURA, nosotros como Entrenadores Profesionales jamas someteriamos a nuestros Clientes fuera de Condicion o pasados de peso a hacer estos LOCOS ENTRENAMIENTOS en estos DVDS si como entrenadores sometes a este Trauma a tus clientes “No tienes bada de Profesional”. Yo como entrenador te preparo primero especificamente para la actividad o deporte que tu escojas, llevando de la mano desde 0 hasta 10 en Tecnica, conociminto de el ejercicio esenandote el porque del ejercicio y el como hacerlo de manera efectiva y practicandolo varias veces hasta que lo hagas Perfecto y tu Solito sin que te lastimes. Creanme la mayoria de estos Videos y los participantes son gente o atletas que pueden hacer estos LOCOS Workouts si tu lo haces te vas a lastimar ya que no te explican lo que te menciono anteriormente “tecnica y practica”.Es por esto que este mes te explicare “5 MOVIMIENTOS DE KICK BOXING”para que los aprendas y practiques, te dare la tecnica y los movimientos de el cuerpo que utlizaras para que no te lastimes las munecas ,tuerzas el talon o te rompas una rodilla al golpear o pegar. Esto lo puedes practicar con un oponente “IMAGINARIO” o puedes comprar tus guantes de box y tu totem para golper muy baratos en BIG 5. Por favor utiliza ropa no muy apretada y que sea elastica ya que si usas algo apretado al dar la primera patada escucharas de trasero el degarro de tus shorts o pants. Asi que comenzemos:
“Ponte tus guantes, deja tu dedo pulgar levantado, ahora acerca tus otros 4 dedos a tu palma y ahora pon tu pulgar arriba de tu dedo indice para hacer un puno duro. Tus nudillos seran las armas con las que vas a pegar al “totem o a el peleador imaginario”.


1.- Jab.
Empezaremos con la Posicion de Pelea la cual es: de tus pies abiertos al ancho de las caderas daras o moveras una pierna hacia atras,flexionando y levantado tus manos a la altura de tus ojos y orejas, recuerda que tus brazos seran las armas para golpear pero tambien te ayudaran a proteger tu cabeza si te quiren patear o pegar. Entonces imaginemos que la pierna derecha es la que mueves atras, tu pierna izquierda y mano izquierda estran al frente CORRECTO?....esta mano izquierda esla que dara EL JAB estirando el brazo completamente para dirigirlo a la mandibula del oponente, pegaras con los nudillos siempre y no se te olvide que el sello de el puno es tu dedo pulgar arriba de los otros 4 dedos, tu brazo estra completamente extendido, abdominales apretadas en tu cuerpo, tu mano derecha aun estara arriba y cerca de tu ojo derecho para proteccion de tu cara!!!!ve la imagen #1.


2.-Cross Punch (golpe cruzado).
Aun en la misma posiscion de combate ahora alinearas tus caderas al frente y el brazo derecho que esta cerca de tu cachete derecho golpeara con los nudillos al frente llamandolo CROSS PUNCH, el alineamiento de tus caderas y de tus hombros hacia el frente te daran el poder de tu golpe hacia la barbilla del oponente por favor ve mi posicion en la foto, abdominales apretadas y pies bien pegados al piso ver imagen #2.


3.- Hook (gancho).
AUN estas en la posicion de combate, ya hiciste el JAB con el brazo izquierdo, CROSS PUNCH con el brazo derecho y ahora utilizaras de nuevo el brazo izquierdo para hacer EL HOOK o gancho el cual saldra bajando tu brazo izquierdo cerca de tus oblicuos para imaginar que hace un gancho con tu brazo y levantaras tu puno hacia arriba para pegar directo a la mandibula, mira la imagen y ve como mi cuerpo se curva y mi mano hace el gacho flexionando la espina un poquito.ver imagen #3.


ENTONCES de la posicion de combate te saldran el “JAB 1 , CROSS PUCH 2 y EL HOOK 3”: JAB BRAZO IZQUIERDO/ CROSS PUCH BRAZO DERECHO/ HOOK BRAZO IZQUIERDO...Echemosle ritmo!!! 1 -2 -3...pega 1, pega 2 pega 3, vuelve a leer mis instrucciones de los 2 primeros golpes para que puedas hacer la continuidad de el tercer golpe.

4 .- Patada de frente empujando con la bola de el pie.
Aqui de la posicion de combate la pierna que tienes atras es la que pateara!..elevando tu pierna y cuadricep hacia el frente ,elevando la rodilla lo mas alto que puedas pierna flexionada, y al dar el golpe empujando y estirando la pierna hacia el oponente y golpeando con la bola de el pie como si quisieras abrir una puerta atascada. Tus manos aun estan flexionadas y levantadas cubriendo tu cabeza, en esta patada trata de pegar arriba de el obligo, aprieta tus abdominales y utiliza el peso de tu cuerpo para aventarlo cuando peges con la bola de el pie.ver imagen #4


5.- Patada de lado.
Mira la imagen,te alejaras un poco de la bolsa para patear, manos arriba cubriendo tu cara, levantars la pierna que esta cerca de la bolsa y la dirigiras estirandola y pegando con el talon hacia un lado,pegando arriba del el ombligo, la pierna esta completamente estirada y utilizaras mucho balance!!!.ver image #5.


Practica ambos brazos y piernas. Hare un clip para ustedes en You Tube de esta Rutina asi que dirigete este mes a mi Facebook: TU ENTRENADOR OCTAVIO. Gracias a ULTRABODYFITNESS GYM el las fotos que me ves.


Bendiciones Octavio

Gracias a ULTRABODYFITNESS GYM por usar las instalaciones en mis fotografias.